 |
 |
|
 |
|
MAKE CUSTOM HATS FOR YOUR MINISTRY
Make Your Own Custom Hats Like A Professional
by David Goebelbecker, Kidco Labs
Most iron-on transfer materials provide instructions for ironing onto a T-shirt. This is relatively
easy because a shirt can be stretched flat onto any surface to receive the transfer art. Hats are seldom,
if ever mentioned, because they differ so much in size and material. They are also a challenge since it is
difficult to get the surface flat enough to iron on the material without wrinkles and creasing—difficult,
that is without a system.
We have found a method that works well for us for small batches of hats. It may seem a little bit "jerry-rigged",
but the results are very good. If you have never made hats or T-shirts before, you will want to allow yourself
ample time to test the transfer material and process to make sure you feel comfortable with the results. But
with a little practice and determination, you'll find that it's not as intimidating as you thought once you
get the hang of it.
If it is your first time making hats or using transfer materials, you will need to leave yourself a large block of time
to experiment first, so that you can work without feeling rushed. Like the
T-shirt instructions on this site,
it will require a little testing, a little thinking and a lot of patience.
PREPARING THE MATERIALS
We have supplied an overview of the process we use below along with some illustrations to help demonstrate
the method that works well for us. Our hope is that you find these instructions helpful and are as pleased
with the finished product as we are.
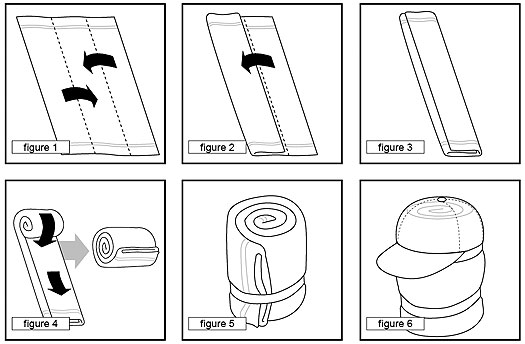
You will need a large beach size towel, or two smaller bath towels. Lay the towel(s) out on a flat surface,
like a table or the floor. [See figure 1 below.]
Next, you will want to fold the towel(s) in thirds lengthwise and roll it up as tightly as you can. It should
feel very solid when squeezed and be about the roundness of a head. This will become a form that you will be
placing the hats onto to hold them in place while ironing the logo onto the front. [See figures 2–5 below.]
Test the size by taking one of the hats and placing it over the towel. You will want to unfasten or loosen the back
of the hat to allow you to pull the hat over easily. Once the hat is in place, press on the area where the
transfer will go. It should feel solid and smooth, leaving little room for the hat to move around.
Tape the bottom of the towel to prevent it from unrolling during use. If you are planning to make a large
quantity, you can make several towel forms so that you can allow a hat to cool on one while working on another.
It saves a lot of time. [See figure 5 & 6 below.]
Note: If you are using two bath towels, you may only need to fold the towel in half. Follow the rest of the steps
and once it is tightly rolled to the right roundness, tape the bottom as shown in figures 5 & 6.
|
|
 |
|
 |
|
|
|
|
A WORD OF CAUTION
The following steps will be followed repeatedly as you make your finished products (your custom hats).
Before you start using good materials, you will want to make sure that you do a few tests. Read the instructions for
the transfer material with regard to iron temperature settings and time that heat should be applied. Use an old hat or
scrap material to run a few tests for time and temperature. We found that using an iron set just under full heat for about
20-30 seconds with the steam setting "OFF" gave us the best results. It's a good place for you to start your testing.
If your iron is set too high or you apply heat for too long, the logo will burn or start to look yellow. If you are using
too low of a temperature or too little time, the logo will be loose in places or have air bubbles appear underneath.
These will cause the transfer to detach in time. By applying more heat or lengthening the time heat is applied, you can
easily fix this problem. You will need to find the balance between the two that suits the materials you are using.
When making hats, one helpful tip we found is that by moving the iron slowly in a circular motion over the full decal area,
the heat was better distributed so that all areas received equal heat. You will also need to apply pressure to the iron to
make sure that the decal is pressed tightly against the material so that no gaps or creases can form.
|
|
|
|
|
|
|
|
|
IRONING ON THE LOGOS
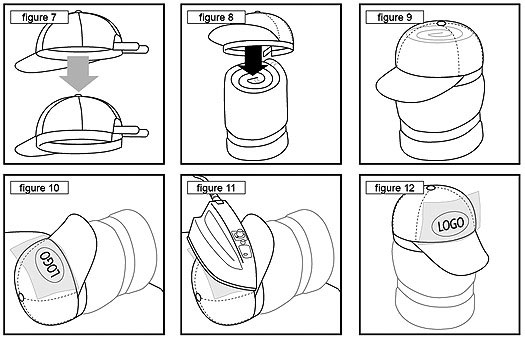
Inside a hat, there is a headband liner that will need to be pulled inside out before placing the hat onto the towel form.
Keep the back fasteners open while you are doing this and place the hat onto the form. You will once again want to push
as much of the towel form into the hat as possible to create a solid smooth surface in the front of the hat.
[See figures 7-9 above.]
You are now ready to transfer the logo. Place the hat on the towel form on a hard flat surface, like a table or the floor.
(We use an ironing board because we can adjust the height of the surface and it's already where the iron is.)
IMPORTANT: Use the same iron settings and time that was used during your test set up mentioned above.
If you have not completed a time and iron temperature test, do so before you proceed to minimize waste.
Also, make sure that the steam setting for the iron is OFF!
Place the trimmed logo onto the front area of the hat and visually position it where you want it. If you are using the
dark T-shirt transfer material, you will have had to remove the backing and placed the decal face up on the hat.
[See figure 10.]
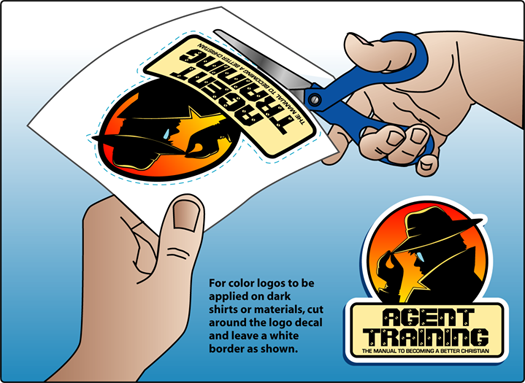
NOTE: The illustration below shows how the finished logo should look once you have trimmed out the edges. You will need to be more
careful with the transfer sheets for dark materials because this edge will be visible and outline the logo or image. To save time,
we recommend trimming out all of your logos ahead of time.
|
|
|
|
|
|
|
|
|
Next, you will need to carefully place the ironing sheet over it so it doesn't shift position. Then, carefully place
the heated iron over the ironing paper and slowly move it in a circular motion, pressing firmly and making sure that
you are covering as much of the logo with the iron surface as possible. [See figure 11.]
Once you have applied heat for the time that you determined during your tests, remove the iron and allow the transfer
time to cool before removing the ironing sheet and your hat is ready to wear. [See figure 12.]
|
|
|
|
|
|
|
|
|
 |
PART OF THE PACKAGE
These instructions have been adapted from the Kidco Labs curriculum materials. In each series, we provide a resource CD
with logo sheets of each series logo in PDF format for you to use. We believe that every ministry should have a
chance to make a great impression on the community and using hats and t-shirts are a great way to get the message out
about your ministry and what you are doing.
|
|
|
|
|
|
|
|
|


Articles Overview
Powerful Praise and Worship
The Science of Leading Great Games
Creating An Effective Environment
Leading Children To Christ
Creating Custom T-shirts
Making Custom Hats
Using Fonts Effectively
Add A Little F.U.E.L. To Your Lesson
Is Your Ministry Running On All Cylinders?
Live. Laugh. Learn.

Resources Overview
Leader Resources
Game Zone
Worship Resources
Download Center
Articles

|
|
