 |
 |
|
 |
|
CREATING CUSTOM T-SHIRTS
Make Your Own Give Away Prizes Worth Prizing
by David Goebelbecker, Kidco Labs
Not every church has the budget to make T-shirts for the children's ministry that can be given away
as prizes, however there are ways to take the "do-it-yourself" route that can have good results with
a little know-how, some time and a few resources.
Over the years since we started Kidco Labs, I have lost count of the number of times we've made shirts
or hats for kids to give away as prizes. Some were given as rewards for games or special prizes, and at
other times they were rewards for children that had achieved goal or completed a specific assignment.
There were a few times in the past that we made sure that every child had a shirt with the logo on it that
they could wear with pride to show their friends. Regardless of the purpose, we made many of them by hand
without help from outside resources and had extremely good results.
If you have never made T-shirts before, you may find it a bit challenging and time consuming if you don't know what
you are doing. We recommend taking a little time to practice before you commit to a larger project. You will need a
computer and inkjet printer, a few sheets of transfer material, an iron and ironing board and some old T-shirts
or scrap material. Follow the steps that we have outlined below and you should get the best results.
STEP 1: Creating the Images
Before you create and print your transfers, you will need to know where they are going to go. If you would like to
make one large image to go on the front or back of the shirt, you will need approximately one sheet of transfer
material per shirt. If you like to have a smaller pocket size logo on the front or centered on the back, you may be
able to get more logos on a sheet.
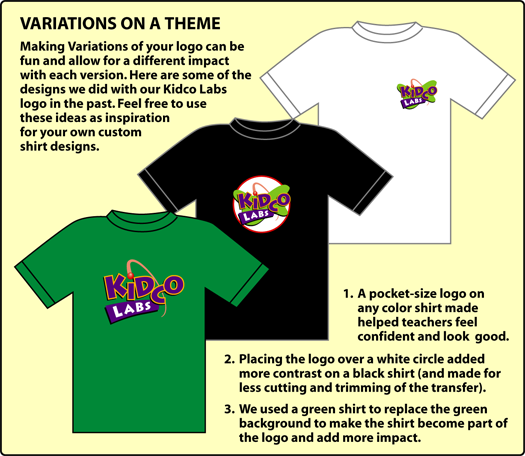
Below is a diagram that shows some options for logo placement, but you are not limited to these. Be creative and
try something new if it works for your design.
|
|
 |
|
 |

|
|
|
|
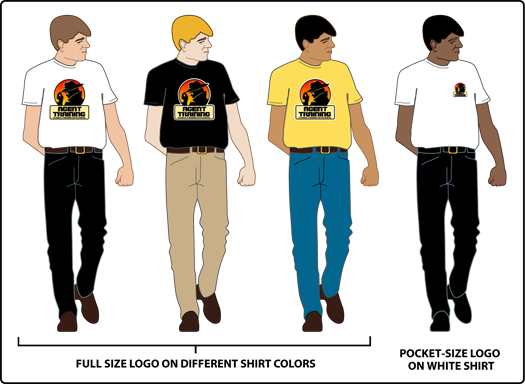
STEP 2: Determine Your Color Options
T-shirts come in rainbow of colors and depending on the logo you are applying, you can get different results depending
on the color. As an example, we have used our Agent Training logo to show you how the same logo looks different when
placed on different color shirts. The most common and usually the least expensive is white, however, unless you get
a higher quality shirt with thicker material, they can be somewhat transparent.
There are other options to the standard white t-shirt. Black shirts offer contrast with a color logo and can help
them really stand out. You may also choose a color that is part of the existing logo, like the yellow shirt example.
The yellow shirt stands out a little more and the logo is part of the statement. Either choice works well. The pocket
size logo looks a little more professional and is great for leaders, workers and adults. It also requires less transfer
material, so it becomes a less expensive option that doesn't look like your cutting costs.
|
|
|
|
|
|
|
|
|
Step 3: Creating Your Transfer Sheets
Now that you have determined the placement of the logo and have an idea of the shirt color, you can create your transfer
sheets. Open the application you are going to use—Microsoft Word or any word processing application that allows you to import
pictures on a page—and start with a blank 8.5"x11" page. Import the logo and size them to fit accordingly.
Depending on the logo size and shape, you may be able to get one or two pocket size logos on a sheet beside a larger
full-page logo. These smaller logos are great for making hats, book bags, or alternate T-shirt designs. It also allows
you to get the most out of your transfer material by reducing the amount of waste.
Before printing your logos to the transfer material, print out a test on paper to check margins and print quality.
Make sure that the colors look right and nothing is being cut off at the margins. You will also need to check the
instructions on the transfer material to see if you need to print it in reverse. Some transfer materials for white
or light colored shirts require that you print a mirror image of your transfer, where the transfer materials for
darker colors can be printed normally.
NOTE: I usually use the transfer materials for dark shirts because it works on light and dark colors. It allows
me the freedom to print out logos the same way every time with less time spent testing and experimenting.
Step 4: Cutting Out the Logos
After you've printed your test pages with logos on paper and you are sure that they have printed correctly and
according to the instructions on the transfer material, you are ready for a real label test. Place a sheet or two
of the label material into your printer and print them out. Make sure you give them a chance to thoroughly dry before
handling so that you don't smear the image. (Some inkjet printers use more ink than others and prints can come out
still damp.)
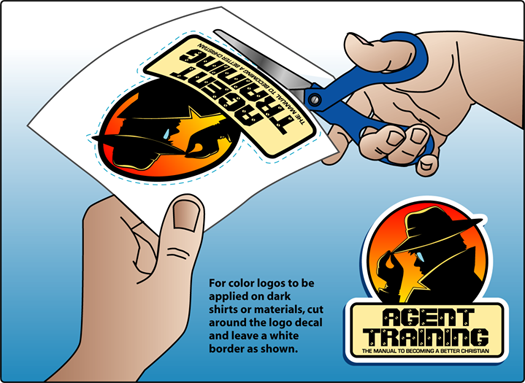
You will now want to cut the logos apart and trim them as close to the image as possible. For the dark transfer
materials, you need to be more careful because the edge that you cut will be visible on the shirt. If you want to
not have a white boarder, you can opt to flood the entire paper with a color that is as close as possible to the
color of the shirt. This will allow a color border around the logo that should blend closely with the color of the
shirt. See the illustration below for clarity.
|
|
|
|
|
|
|
|
|
Step 5: Transferring Your Image
Read the instructions carefully on the transfer materials and follow the steps that they provide since they differ from
depending on who produced it. If you have small logos on your sheet, it is better to do your first tests with these so
you can check iron temperature and time required to transfer.
Start by following the instructions as written and then check the results. If the image is not fully applied, you will
need more time or more heat. But be careful not to leave the iron on the decal for too long or it will burn it.
NOTE: Many of the manufacturer's instructions say to put the iron on the highest setting. I have found that with my
irons it was better to decrease the temperature slightly and increase time to avoid burning the image. If the iron is
too hot, it will scorch the image or the edges and cause what is white to look yellow. It's something to keep in mind
when testing.
Step 6: Quality Check and Production Time
After a test or two, you should have an idea of how long it will take and how much heat is required for a solid transfer.
At this point, you are ready to start producing the shirts. Remember that after you have allowed the proper cooling time
for each shirt, you will need to check to make sure that each logo has adhered correctly. If it still has loose spots, you
can carefully apply a little more heat, but don't leave it on for the full amount of time or you will risk burning the image.
CONCLUSION:
I learned to do shirts like this when working with a smaller ministry because it gave me the ability to create a quality
product to give away as a prize to the kids without a lot of cost. I bought most of the shirts, hats and book bags at a craft
store for around $5 each or less and the transfer material is about $10 for 12-15 sheets. It gave me a variety of quality
products that I could give away as prizes or rewards for extra hard work without spending a fortune. I've created so many
things in the past that I feel like a pro and have fun each time.
|
|
|
|
|
|
|
|
|


Articles Overview
Powerful Praise and Worship
The Science of Leading Great Games
Creating An Effective Environment
Leading Children To Christ
Creating Custom T-shirts
Making Custom Hats
Using Fonts Effectively
Add A Little F.U.E.L. To Your Lesson
Is Your Ministry Running On All Cylinders?
Live. Laugh. Learn.

Resources Overview
Leader Resources
Game Zone
Worship Resources
Download Center
Articles

|
|
